THE MICRO USER GUIDE TO PLAYING AVIATOR
The Controls
Aviator has a large number of controls - joystick - left (S), right (D), forward (L) & backward (<). These keys are replaced by the real joystick.
The others are throttle - increase (E) and decrease (W), brakes on/off (B), undercarriage up/down (U), flaps up/down (F), guns (Shift) and gunsights on/off (I). We make that 11 and, we know you've only got 10 fingers, but you won't need all the controls all the time.
The Instruments
It isn't much good having all those controls if you can't tell what your plane is doing. To this end Aviator provides you with a comprehensive instrument panel which you will need to know and understand thoroughly if you are to become an ace pilot. It is shown in Figure I.
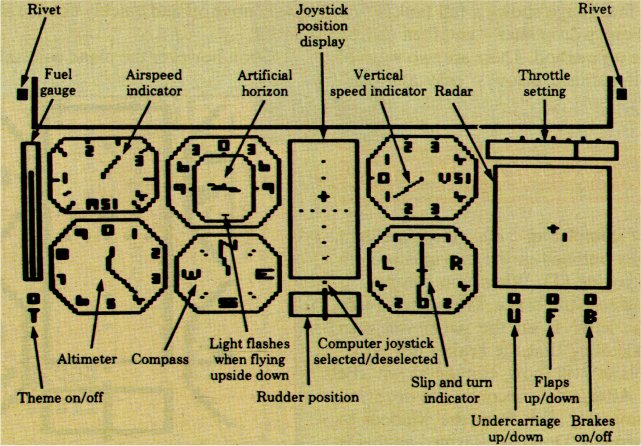
Click here for larger image
The joystick indicator is in the centre of the panel for the very good reason that you will be using it 99.9 percent of the time. It shows the position of the Spitfire's joystick. If you play with real sticks the cross will be in the same position as your stick relative to its centre.
If you play with keys the four controls S,D,L and < move the cross. It should be noted here that you can't play Aviator with Atari-style digital joysticks. More on the joystick and how to use it later.
The altimeter shows your height above the ground and is therefore obviously quite important. It is read like a clock, with the short hand showing thousands of feet and the long hand hundreds of feet. Your actual height is obtained by adding these together.
The airspeed indicator shows you how fast the plane is moving in the forward direction. It is calibrated in divisions of 100mph. The vertical speed indicator shows the rate of climb or descent of the aircraft in thousands of feet per minute.
Then there's a radar screen. The plane is equipped with a fairly basic radar, though it's not at all bad for a World Wr II aircraft. The Spitfire is represented as a cross in the centre and the airstrip as a line.
Nothing else is shown on the radar except in combat mode, when aliens are represented as dots. The direction of travel of the plane at all times is vertically up the screen. Note that it is inadvisable to stare at the radar except when in level flight.
The rudder indicator shows how far the rudder is moved from its central position.
The compass is self-explanatory. The pointer indicates direction of flight.
The fuel gauge is more important than you might think - keep an eye on it from time to time. The higher the bar, the more fuel remaining.
The artificial horizon shows where the plane is aligned relative to the horizon. It is important, but you will probably find that a lot of the time the view out of the cockpit is enough and it is therefore unnecessary when the ground is visible.
The turn indicator shows you how fast the plane is turning. It is very rarely, if ever, used.
That's the instruments dealt with. Now let's look at the use of the controls and flight dynamics, or "What keeps the thing in the air".
How a Plane flies
One of the reasons why people have difficulty with Aviator is because it is 3D. Unlike, say, a Pacman-type game there are no "up, down, left, right" keys. Instead there is the plane's joystick. This controls the inclination of the plane to the ground, not directly the direction of movement.
When the stick is pulled back the nose of the aircraft lifts and, as a result, the plane will move upward. Conversely if the stick is pushed forward the nose drops and the plane dives.
Likewise if the stick is pushed left the plane does not move left, but rolls counter-clockwise. Pushing the stick right results in the plane rolling clockwise.
By a combination of rolling and diving or climbing the plane's direction can be controlled. It is important to realise at an early stage that after rolling, diving or climbing when you centralise the stick the plane does not level out but maintains its altitude. To level out you must move the stick in the opposite direction until the plane is level again.
If you hold the nose up eventually the plane will flip over in a loop, similarly if you hold the stick left or right the plane will roll over and over. Therefore it is important to move all the controls gently and smoothly.
If you play with keys remember that sometimes the plane can seem slow to respond and this can cause a tendency to over-adjust which you must learn not to do.
You start at the southern end of the airstrip facing north. For those of you prone to over-enthusiasm don't start the engine and roar off into the sunset because you haven't released the brakes and you don't have any fuel.
Instead, while you are waiting to be tanked up, open the throttle fully (E). Wait until the fuel gauge shows a full tank - you will need every drop later - and then choose your take off method. There are two ways of taking off outlined below - easy and dead easy.
How To Take Off (1) Dead Easy
After completing all the preflight procedures outlined in the previous section start the engine (T). When you can hear it buzzing release the brake. The white square above the letter B on the panel will turn black, indicating that the brakes are off.
The plane will now trundle down the runway. After a few seconds the nose will lift, causing the view from the window to bounce around. Don't be alarmed as this is perfectly normal.
What you do now is - nothing. The airspeed will rise gradually and right at the end of the runway, just as you think you're not going to make it, the wheels will leave the ground. As soon as this happens retract the undercarriage (U).
That was easy, wasn't it? However, as with everything in life, being that easy this method has its drawbacks. The main one is that the plane is moving and climbing relatively slowly on take off and it therefore takes quite a time and a fair amount of fuel to get to a good cruising altitude. Using the second method solves all this.
How To Take Off (2) Easy
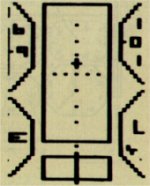
Complete the preflight checks as before, but also move the plane's joystick straight forward (L) so that the cross just touches the first dot above the centre - Figure II. Start the engine and release the brakes. The plane will move off and quickly bounce about quite a lot.
Soon however the plane will stabilise, and we can briefly look at the reasoning behind what you're doing at this point. The plane will be trying to take off once it gains enough speed, but you are trying to push it into the ground. Because of this it gains more speed more quickly.
Nerves of steel are needed for this next bit until you get used to it. You must wait until the plane is at the very end of the runway before lifting off for maximum velocity. Watch closely as you move down the runway, and as the end comes into view concentrate hard.
When the end is about one cm above the bottom of the window - that's on a monitor or portable TV - pull the stick back (<) so that the cross is just under the central position and retract the undercarriage.
Watch the artificial horizon now, and wait until the horizon and plane bars are one pixel apart. Centralise the joystick and wait again until the airspeed falls to the 150 mark. Now push the stick forward until the horizon and plane bars merge on the artificial horizon.
You should level out at about 2,000 feet, flying at 140mph. This is a safe height, but as you get more advanced you might like to level out earlier, especially when in combat mode.
The Middle Bit
Now that we have taken off what can we do? Well there are three main options open to us, but it's too late for combat and if you're a beginner you'd better leave stunts for the time being, so we'll start with training.
The first thing to practice is turning as this is fairly vital to steering the plane. In order to turn, since there are no directional controls - you have to roll the plane.
So to turn from your present north-facing position to fly east - a right turn - you have to roll the plane clockwise. Do this by moving the stick to the right slowly. The horizon line will tilt counter-clockwise. Remember that this is the plane moving and not the ground.
When the horizon reaches an angle of about 30° to the horizontal centralise the stick. Note that if you play with keyboard a single tap on the left key will centralise the stick and you must not hold the key down.
You will find that sometimes the nose tends to drop of its own accord after you have entered the turn. A little back pressure on the joystick will correct this.
What is now happening is that you are flying with the wings tilted at 30° to the horizontal. Because of this, as you can see from the compass, you are turning. Centralising the stick does not stop you turning - it holds you in a steady position, turning at a constant rate.
Watch the compass. As the pointer approaches the east mark move the stick left, and watch the window as the plane straightens up. When the plane is level centralise the stick again and with luck you should be flying level in an easterly direction.
Because there is a time difference between operating a control and seeing its effect you have to anticipate what is happening. This comes with practice.
Dive and climb are achieved in a similar manner with stick forward and backward movements. This is basically all you have to master, so practice as much as you can. Once you have learnt to control the plane easily and predictably you are ready for some more advanced flying, namely stunts.
In the section that follows it will be assumed that you can enter and exit turns smoothly, pull fairly tight turns and generally be a reasonable flyer. If you don't think you fit this description go back and practice until you do.
Stunts (1) Acornsville
Most people who play Aviator take the bridge as their first challenge, but this should really be the second since flying through Acornsville is actually much easier. One of the main reasons for this confusion is that the Aviator map is misleading in its representation of Acornsville.
The map appears to show the main street as running from north-east to south-west. This is in fact not the case - the street runs east-west and knowing this makes flying through really easy.
Take off in the northerly direction and climb to around 500 feet. Pull a very sharp turn to the right and head due south. After a few moments you will see two mountains, one directly in front of you and another to the right of and behind it.
Fly over the first mountain and when you judge that you are sideways on to the second turn right again and head due west. You are aiming to fly directly over the top of the mountain.
It will now take you a short time to get to Acornsville - keep the plane as level as possible and on no account let your height exceed 750 feet as you have to be able to get to about 20 feet to get the points for flying through the town.
When you see Acornsville ahead look for a pair of lines sprouting from the bottom of the buildings. These are the edges of the street. Line yourself up accurately using these, dive slowly down and through you go. That's all there is to it - after doing it once you will never fail again.
And so on to the bridge - flying through Acornsville is a good training flight for this.
Stunts (2) The Bridge
It is at this point that many new Aviators ask the question: "Where's the bridge?" You want directions? OK.
Take off as usual and climb to 500 feet. Gently turn left until you are heading just south of due west. After a few moments you will see an octagonal shape below you - this is the lake.
You can now choose one of two ways to get under the bridge, either slow 'n' easy or "ace pilot". Unless you are a pretty good pilot stick to the former to begin with.
Let's start with the slow 'n' easy method. From where we left off above go into a very gentle dive for about a minute, then turn gently right to head due north. You should find youself pointing straight down the river at the bridge.
You simply have to get yourself to the right height and you will glide through. Don't jerk the controls as you approach as when you are only 50 feet off the ground you don't want to start a steep dive for obvious reasons.
Don't fly too high either as the bridge will come off best in any collision. After flying through you should hear a beep signifying success, and if you press P (for points) you will see you have scored 50 points.
After you have succeeded with the first method a few times it's a logical follow on to try the "ace pilot" approach, which is as follows:
Put a bit of extra room between you and the drink before commencing the manoeuvre. Wait until you are above the lake's shore then go into a steep dive and a very tight right turn at the same time.
Judging when to pull out of this is the difficult bit, but after trying it a few times you should find you can pull out so as to be facing down the river about 20 feet above it, flying level but quite fast.
If you can hold it level like this you will shoot under the bridge and out the other side so quickly that you won't have time to think about how dangerous it is.
The End (nearly)
There is only one thing left to discuss now, and this is the combat mode. You select this option by firing a single shot (Shift) before taking off. The plot, such as it is, is explained in the Aviator documentation so we won't go into that. Let's just get right on and start killing those aliens.
These start very small, sitting in fields. They eat and grow until, when they are big enough, they take off and head towards Acornsville to eat(?) it. Obviously once they get there it's curtains for the inhabitants, so it's up to you to save the town.
One shot kills an alien, but the big problem is that in order for this to work properly the shot has to actually hit the alien. As they spend a long time on the ground, not moving at all, it would seem to be a good idea to launch your attack at this stage.
However there are two problems with this. The first is that the aliens are small and hard to hit. The second more important one is that they do not appear on your radar until they are airborne. This means that it's a matter of luck whether you spot them or not.
Basically you have to buzz around the fields at low altitude - 100 to 200 feet - and try to find one. If you succeed you shoot it, if not, tough luck. When you find an alien, either by luck or by using the radar, the next thing is to kill it.
Now we come to another catch because it would seem that the closer you are to one the better your chances of actually hitting it. While this is true there is yet another problem in that when you are close and shoot it, it dies and explodes.
The air turbulence caused by the explosion can literally smash your plane into the ground in a matter of seconds. If you are reasonably careful though these problems sort themselves out, and you can manage to keep the attack at bay.
When shooting an alien on the ground take your time as it's not moving, but don't get too close. When lining up on any alien the technique is the same - point the plane roughly at it, then start a very gentle turn and use the height keys to line up as you turn to face it.
Simply fire when it appears in the centre of your sights. You may well miss the first couple of times, but keep trying and soon you'll have a 100 per cent success rate.
While you're shooting aliens you probably won't be watching the instruments too closely, so this is as good a time as any to talk about stalls and other ways of crashing.
A stall in a plane is when the airspeed falls so low that the plane loses lift and consequently plummets to the ground. A stall on Aviator is signalled by a series of low beeps like an old-style phone box and the air speed indicator - if you get a chance to see it - will be below the stall mark, which is about 70mph.
If you stall when flying low forget it as you will not survive. However if you have a bit of height you can get out of it simply by pushing the stick forward and diving. The airspeed will rise and soon the plane will be controllable again.
At the opposite extreme going too fast can also be fatal as the forces on the plane get so high that the wings fall off. This is signalled by a high pitched shriek. Again if you have enough height it is possible to survive by pulling back on the stick gradually and climbing to reduce the air speed.
Back to aliens now, and what to do if they are in the air. There is little risk of stall here so concentrate on that alien. You must try to kill it quickly as it is now on its way to the town. Basically the technique is the same, but you should try to attack from above rather than from below as this is safer.
Because the alien is now moving you will need to aim slightly ahead of it so that it will fly into the path of your cannon shells. The best way to get good at combat is simply to practice as much as you can.
In every Aviator's life there comes a time when the Spitfire gets a bit low on juice, and as in-flight refuelling is not available you will have to land - no docking computers this time, folks.
There is a legend that says landing on Aviator is impossible. This is only partly true, though after a few attempts you might think otherwise. Landing itself is not a problem, the difficulty arises in lining up on the runway at exactly the right speed and altitude.
To make this as painless as possible proceed as follows - aim the plane at the south end of the runway using the radar. If you have a fair bit of height it can be a good idea to glide, so turn off the engine and dive slowly.
This will keep you going a long way but keep an eye on the altitude and airspeed and be ready to put the power back on. When you get close to the runway you will see a mountain just past the end - the one you used to find Acornsville.
When you are over this simply head north and you will see the runway ahead. You might need to so do some final realigning but you will be generally OK. Your height should be about 1000 feet and your air speed around 225 mph at this point.
Now to actually putting the thing down. Your plane is equipped with a vital set of kit known as flaps, the function of which is to provide lift and to slow you down.
From your position above cut the engine and dive towards the end of the runway. Keep it gentle and you should find yourself just short of the runway so put the flaps on (F) and lower the undercarriage (U). Your air speed must be below 150 for the flaps to operate.
If it looks like you'll hit the ground before the start of the runway restart the engine and climb slightly.
When you are over the end of the runway, throttle back and keep the sink on the VSI less than 500 ft./min. - half a division on the scale.
The plane will then gently mush down on to the ground. Do not do this from too high up or you may stall sharply before landing and crash. If you bounce slightly push forward on the stick then pull back again straight away - this loses you your height but keeps the nose up.
When your wheels are on the ground
apply the brakes and roll to a halt. Assuming you made it, your
aircraft will now be refuelled and then it's turn round and back
to the skies to give those aliens hell.
This article appeared in the October 1986 edition of the "Micro User", published by Database Publications.
Scanned in by dllm@usa.net
http://www.stairwaytohell.com